


So all righty, getting back to the budget-friendly, small laundry room
makeover project! Let's wrap up this tiny, narrow space from drab to fab
with DIY shelves, a new pegboard, all after some serious wall stencil action.
Well, and a little decorating too. Plus the full reveal!
Considering this room is as diminutive as it is, in compressed time it was a
quick flip from drab to fab. I sound a cheeseball voice-over going into
commercial break.
(FYI: this whole thing follows my method from
The $100 Room Glow-Up Guide. Watch how it unfolds. Neat, right?)
So yes, ok, last we left off on this fancy pants laundry room makeover,
the wall stencil paint was complete and I installed a ceiling light
fixture.
That
stencil
makes me oh-so-happy. Like I'm rolling my eyes around so happy.

|
| Where next to use this stencil?! |
And that light fixture? It does bring me joy.
Next I needed some shelves. Well, need is an embellishment as I
didn't need them, I just reasoned they'd look spiffy.
Luckily one day I happened across a posting on one of those social media sites
that
a nearby furniture maker
was moving shop. They were giving away leftover wood they weren't
moving, come n' get it.
Whoa. Free wood from a furniture maker?
.......Right?!
So yeah I hustled my a** over there. The hoards rapidly lined up behind
me but I managed to grab some stuff. Wish I had grabbed more but I uh,
didn't want to become a wood hoarder. It's merely a
wee basement shop.
I snagged two boards of unknown type, not matching, both rough, bingo,
shelves, done.
Back at home, I noticed one of the boards had those teeny little bug holes,
those damn powderpost beetle wood boring bugs. Bad news those are, baaaaad news. They can spread and destroy
your house.
Sooo I tried tricks I read online to kill them....leave the wood out in the
sub-zero cold, out in scorching heat, use borax, use
Timbor,*
and literally nothing worked. I had to part ways with that piece of
wood, sadly.
Replacing it was old-growth reclaimed pine 2x4's from Great Lakes Yard.
In the meantime, I scraped Etsy for brackets, ending up with the ubiquitous
bent steel with a lip type* but I was able to custom order the exact dimensions I needed. Thumbs
up!
But me, not one to leave well enough alone of course, I trekked out to the
'burbs to pick up some cheery
yellow spray paint* (it's illegal to buy spray paint in the city of Chicago which is a huge
pain in the a**, as if that deters graffiti [it does not]) and sprayed the
snot out of the brackets for a nice bright accent.
Because yellow! Favorite!
Also picked up a metal trash bin from HomeGoods and you guessed it, sprayed
that yellow. And some vases from
Dollar Tree* too, yellow. It's the perfect foil for the rich aqua, the white, and blonde wood.
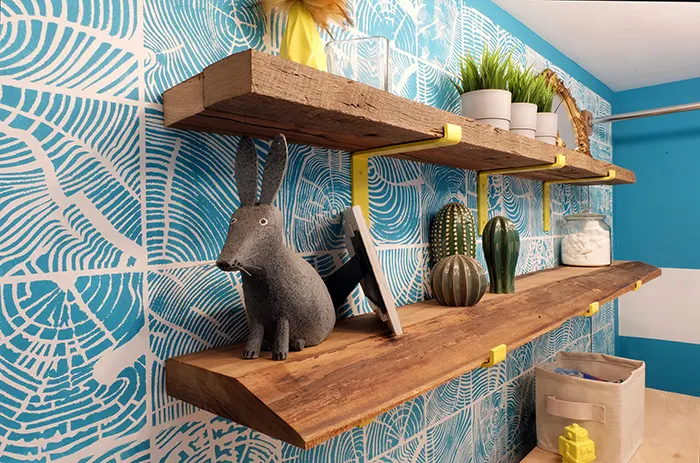
Ok but the shelves…coated the wood in
teak oil*
and in the case of the gruff two-by’s, merely glued them together to get the
width I needed and did nothing more. This was
pre-planer
but even still, I like the rough texture.

Like fashion, rooms require color, texture, shine, and pattern.
Up went the brackets either into studs or with
metal screw-in wall anchors* and thank goodness for that
laser level,* then I hoisted the boards atop. Screws into the wood underneath to
prevent shifting and voila, shelves! Check and mark.
|
| Spray a big spray into a cup with the spray paint, use a Q-tip, and dab the screw heads to match up color-wise. |
While the oversized pegboard did do its pegboard job, it was too weird even for me. And while
the
Supernice vinyl wrap
is well, super nice and a fabulous product, I went too weird.
But, sometimes you gotta explore just to see because sometimes weird does work
out. This is how we learn and learning is *mwah* good.
I pretty well followed the same assembly path as the previous one, based on
the lessons I learned with the
pegboard wine rack. Drill holes, push pegs in, hang on wall.
Here I used a piece of scrap plywood, gave it a couple coats of primer, couple
coats of white latex paint, then pooled some water atop and dabbled in some
black acrylic paint* to create a sort of watercolor effect, using my
heat gun*
to blow it around/dry it up.
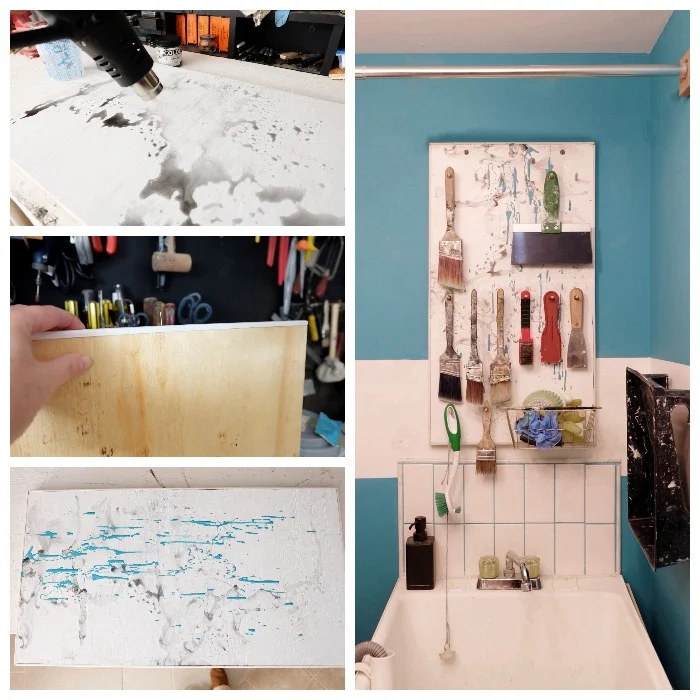
My mistake, I then splashed on some of the aqua in an effort to tie colors
together but eh, bad choice. Ah well.
I used some scrap trim from my voluminous wood stash to frame out the edges
then hung it on the wall
into studs* using those
barn screws* from the
back door awning
adventure.
The remaining decor came from Ikea (the jar, fake grasses stuffed in faux
concrete pots, ceramic cacti, fabric bin) or my parents (the pine cone owl) or
around our house.

And it’s done! The shelves, the pegboard, the DIY budget-friendly
low-budget laundry room makeover is done!

|
| It is so hard to take pictures of this room. |
Or hahaha, done for now!
I cannot even begin to tell you how much I love this room. Love.
Love love love. I went from utterly abhorring the dysfunctional
disaster to now thrilled to be in its presence.

Laundry gets folded in a timely manner thanks to the
waterfall counter; the itty windowless room is finally functional plus it's happy to
boot.

Love it. Pleased as punch. Tickled pink.

A takeaway lesson here? Even The Worst of spaces can be turned around
both visually and functionally. Planning, patience, thought, and study
can fix any design dilemma.
What were my expenditures on this DIY makeover? Many supplies were on
hand already but let’s see:
gas pipe trimming, $40
Wall stencil, $40
Spray primer, $8
Laundry utility sink tub cover, less than $25
Waterfall counter, $160
Shelf brackets, $61
Light fixture, $40
Yellow spray paint, $5
Old-growth 2x4 pine for one shelf, $6
Various decor, less than $40
Wow, well, that’s a low-budget DIY makeover, huh?! About $425?
Wow. See, so low-budget or budget-friendly does not equal bad.
Like I said, planning, patience, thought, and study. Bam.
Yay, laundry room makeover! I am so excited. Yay!

While I've peppered pretty much all the posts about the laundry room
throughout this post, you can start from the very beginning
here while I go nap.
Take this energy and transform your own space. I’ll show you how for
$100 or less. Get The $100 Room Glow-Up Guide.
*The Timbor, wall anchors, laser level, heat gun, stud finders, and barn
screws are Amazon affiliate links while the shelf brackets are Etsy, the
yellow spray paints and teak oil are Home Depot, Dollar Tree is well, Dollar
Tree, and the acrylic paint is a general Michaels affiliate link.
Thanks! Please see the "boring stuff" tab for more info.


The room is SO nice, you don't want to mess it up with laundry, am I right? You want to walk in, admire it, look up at the joyful light fixture and walk out. You don't want to line the shelves with detergent and pods and dryer sheets and stuff you mostly don't use but can't throw out so you keep it elsewhere...some closet somewhere and you bring it in any time you do laundry? Well, that would be me...maybe you're stronger.
ReplyDeleteGreat job all around. Love the stenciled wall, love the light fixture, love all that surface for folding...or serving a buffet style breakfast.
You make the most valid point ever, this room should not be disturbed with frivolous activities like laundry, pffft. I think I'll jaunt down there and do exactly that, take a look and turn around. Although you're right, I do need to start setting up the breakfast buffet spread.
Deletehahaha, thank you very much! Too funny! Sadly there is a tiny shelf unit hidden in the corner behind the counter next to the sink with those pesky laundry related items which I do need to go use right now but at least I'll be cheery.
Thank you for the hilarity and nice compliments!
I'd never want to leave this fabulous room...especially if there's a breakfast buffet every day! Amazing job, Bec!
ReplyDeleteLooks like I’ll be setting up a breakfast buffet here daily! Haha, thank you!
Deleteit looks awesome, the only other thing would be to trim out the front edge
ReplyDeleteThank you! I’m personally a fan of the edge as-is but it definitely can be. Thanks!
DeleteSome really interesting details you have written. Aided me a lot, just what I was looking for : D.
ReplyDelete