Yes.
With an actual laser cutting and engraving machine!
Wow. Yes.
I first must mention, while I was not compensated for this project, I was
gifted the
Acmer P3 48W Diode Dual Laser Engraver Cutting Machine* in exchange for this post. Even so, the opinions forthwith are mine.
And quite the machine it is! Holy cow.
Was I intimidated by this? Yes. Should I have been? No.
Everything is surprisingly simple.
I will readily admit, as I've never used such a fancy machine before nor am I
super technical, it was a learning curve but I very much like to learn.
That's the whole point of life, right? But point ultimately being,
you don't have to be technical to use this.
Nothing is impossible if you set your mind to it. Nothing.
Rawr!
And now, yes, this project will be vaguely familiar in a fashion. This is the exact machine I wished for when I created the super cool foyer light fixture. It would have saved me tremendous time and been infinitely more accurate. For sure.
But, now that I have this spiffy
Acmer P3 Laser Machine,* the world is my oyster, opening up a vast new playground of DIY projects
and crafts.
So what was I to create? Guess we already know! Because...cool
light fixtures are, well, cool, and
are the jewelry of every decor
so in my mind, all light fixtures should live their brightest lives.
I designed this piece myself, so proud too, but if doing so isn't your forte,
no worries as there are oodles of websites that offer pre-designed projects.
I mention this too as I used various software that may be inaccessible.
But again, nothing is impossible.
How did I come up with this design? In
my office, I was staring at the
Mid-Century cabin wall papers
and resolved hey, bump the whole MCM vibe.
For deeper, more specific inspiration, I foraged the interwebs looking at a
slew of laser cut light fixtures plus wood light fixtures in general of the
era or thereabouts, then mashed a bunch of inspo into one.
First up, AutoCAD* which, I know, technical as it gets, but my gerbilly brain knows it.
My recommended substitutes here are achievable across the board:
hand draw the idea; Inkscape
which free and terrific; Adobe PhotoShop; Adobe Illustrator; Canva; whatever
you feel most comfortable with.
You will need software for this but don't panic, I gotchu.
Based on the Acmer's available cutting surface, which is large at nearly
sixteen inches square, I determined my fixture's structure sizing. Key
here: base your design to fit the machine.
For my structure, thanks
Dad, always
thinking of you, I went with fifteen inches long by five inches wide, two pieces, top and
bottom. Drew that up. These got cut out of
1/4" plywood that I had
on hand.
Next was
math. Ugh. For this fixture to hold together without glue or
fasteners, I drew cutout slots for the main body wings to slot into.
Mathing that layout, oy ....but I got it.
Too, as I purchased a pendant light kit, I needed an open slot in the center
top for that to pass through. Most any home improvement store or
Amazon*
will have them. Mine came from
Home Depot* based on its drop and tidy design.
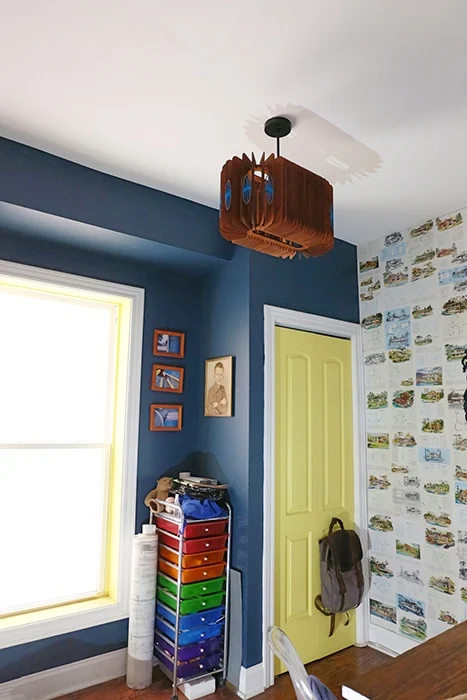
Next, I drew up the wing pieces. Here I went with twelve inches tall by
about four inches wide. I was basing this on craft plywood panels* but later found a much more affordable 4'x8' sheet of
1/8" plywood* at Home Depot, buying me flexibility. Menards
man, lettin' me down on this project.
For pizzazz, I drew up ovals to adorn the curved ends between the
wings.
AutoCAD wrapped, I exported the files to PDF. You can convert PDF to SVG
online easily but those files weren't loading right. What worked was
importing the PDF files into Inkspace and converting them to plain SVG files.
Next was LaserGRBL, the software that feeds the file into the
Acmer P3 Laser Machine* to run. LaserGRBL
is free and simple to use. There's also
LightBurn though
it's fee-based.
Ok, now more about this swanky, powerful, mighty Acmer P3 Laser Machine.*
It's substantial, which is terrific, as it gives you a large working area
inside the machine. It's remarkably straightforward to assemble too,
just plug and play, easy peasy.
The friendly Acmer people expressly pointed out that the laser on this machine
is safe to use indoors. I will note here that the machine does put out
smoke so either build yourself a well-vented enclosure or do as I did, use it
outdoors, as ventilation is supremely important.
Lots of excellent fire and heat safety features are built right in too.
Added bonus, the friendly Acmer people offer fantastic customer support so if
you run into any dilemmas, they're there to help you succeed.
This machine will cut or engrave of course wood but also glass, ceramic,
acrylic, leather, kraft paper, MDF, metals...over two hundred types of
materials. ...Right?! My
cool woodworking friend Scott
keeps asking me to put cheese in there. Uh, nope, sorry.
Truly, it's a pretty remarkable piece of machinery.
Right, so I got LaserGRBL loaded up on my lil' ol' laptop, my SVG files
imported in, then was ready to go.
Hot tip (ahhh pun...laser, hot): test on scrap material first so you
don't waste a whole heck ton of project wood as I did getting things aligned
properly between the screen and the machine.
With nerves ablaze (omg with the puns all of a sudden), I hit the go button
and away she went, quietly cutting away. Holy excitement! Also
included, protective eyewear too;
PPE
is always essential.
After test runs, I did have to redraw a bit as my math was, duh, off of course
on the ovals. No harm, no foul, quick to remedy, and I was back running
in no time.
Be sure to check the manual for speed settings based on the material you're
cutting or engraving; there's a handy card that lists everything out for you.
Honestly, I just could not get over how nifty this machine and process was.
Pop a piece of wood in, hit go, and before you know it, literally only a
few minutes, your project pieces are in your hot (pun again) little hands.
All that was left was to stain, seal, stitch, assemble, and install.
Stitch? Yes. I did some hand stitching. Keep reading....
For the stain, I went with
Gunstock,* matching the
master bath vanity
even though they're a floor apart. If you go with wood like the Home
Depot sheet plywood, do yourself a favor and use
wood conditioner* first before staining. Worth it, trust me.
Once everything was stained, I gave a quick light seal with a can of
Krylon matte finish spray.* Outdoors. That stuff is stinky.
Those little ovals I keep mentioning? I wanted to see what this swanky
laser machine could do, test its precision, so I designed them with tiny
tiny holes spaced around to stitch in embroidery floss.* Bam, the Acmer handled those holes with exceptional
accuracy.
Turned out cooler than I envisioned which is always exhilarating. To
secure the floss ends, a few itty dabs of super glue* did the trick. Just watch your fingers and your
sleeves, ahem....
Anywhoo, let's assemble this bad boy!
Literally all I had to do was slot the wings into the structure pieces.
Slip in, squish gently to secure snugly. I left a few wings off
for installation and light bulb insertion.
As I hadn't designed a glue-free way to connect these fab ovals, I just used
plain ol' super glue. Worked like a charm, dried in seconds.
Off to install, I couldn't believe it!
Ultimately, it's
really not that hard to change out a light fixture
but if you've not done it before, it's best to hire a pro.**
Once the kit was attached, I slid the socket part through the top of the
fixture and secured it with the pendant kit piece that screws onto the socket
housing. Ah see, shop your pendant kits wisely.
Tightened in my spiffy
new light bulb,* slid on the remaining wings, powered the room back up at the
breaker box
and dashing up
the stair fuelled by unadulterated
butt wiggle
giddiness, I flew back into the room and flipped on the light.
Wow.
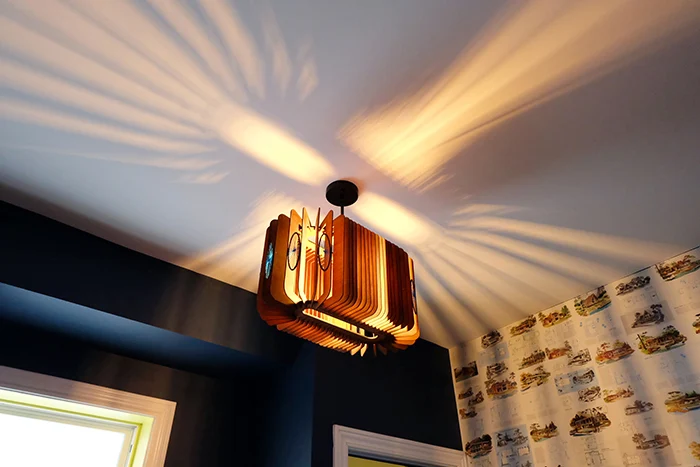
The way the wings throw shadows around?! Omg.
Yes, the fixture is large for the room. Yes, I'm very happy about that.
Yes. Yes. Yes yes yes.
Thank you Acmer, you made my dreams come true.
Need this machine right now? Yes, you do. You can shop Acmer's
website
here* or you can shop on Amazon
here.*
If you shop the latter, use this code for 30% off your order:
30CBE8I1. You're welcome!
If this project got you going, imagine what you could do. Download The $100 Room Glow-Up Guide and see what’s possible.
*The AutoCAD link is an AutoDesk affiliate link. The Home Depot
pendant and 1/8" plywood are Home Depot affiliate links. The pendant
light kits, craft plywood panels, Acmer Laser Machines, super glue, and long
Edison light bulbs are Amazon affiliate links. Acmer links are also
affiliate links for their specific website. The embroidery floss and
Krylon Matte Finish Spray are Michaels affiliate links. The Gunstock
stain and wood conditioners are Lowes affiliate links. Mwah, thanks!
Please see the "boring stuff" tab for more info.
**Disclaimer: Electricity is dangerous. It can hurt you. It can
kill you. Bad wiring can burn your house down. It's best to hire
a qualified, licensed electrician if you don't know how to wire things.
Do not attempt to wire anything without the proper knowledge. Do
not ever take wiring advice from me. And do not blow
your house up.


I absolutely LOVE it!
ReplyDeleteTina! I love your kind words! Thank you so much!
Delete