


(Before you dive in: this whole thing is the approach from
The Interior Decode
in action. Not just theory. Actual results. Sweet.)


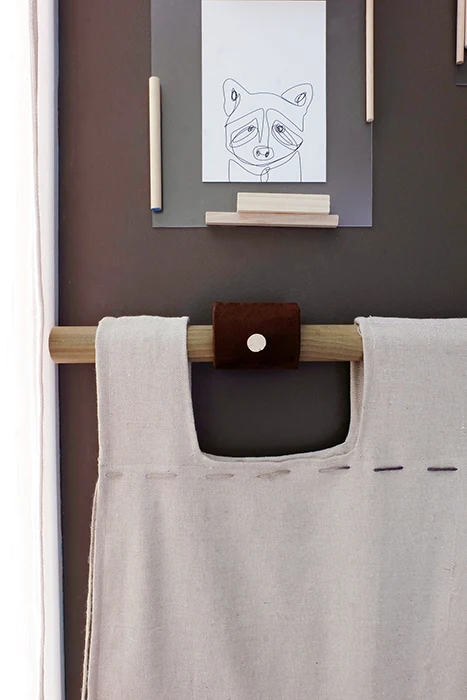
Interested in the adorable raccoon prints? Those are
instant downloads from Etsy* which I then scaled to size and printed out myself. One more* to print but my printer doesn't go that size. Direct links to the
ones I purchased: the
sketchy line* one, the
watercolor-y one,* and then the
minimal one* here.
 A success overall despite multiple fails, I'd say. Smart!
Why does the world need yet another headboard idea? I dunno. But
I hope this sparks some creativity.
Of course we love the removable wood block headboard in our bedroom so Mike got reeeaal nervous when I tossed out
the word "headboard,” poor guy.

|
| Before. |
Originally this was to be a raccoon headboard for
the hall bedroom
but things went awry umpteen times, ugh, and I could not get this
project to go the way I wanted it to, sooo, yeah. Sh*t happens.
Mmmph….It was supposed to be a kind of homage to
Hailey.
Our place in
Logan Square
had rockin' back deck off of the second floor. It wasn't particularly
fancy but it was a prized space, an exceptional retreat masked by a
ginormous, sweet smelling
Little Leaf Linden.
The building next door had a touch of a raccoon situation in the attic and
these cute little trash pandas would pop their curious heads,
yes plural, they'd pop their wee heads out and watch us. Like
six, eight at a time. And Hailey
would watch them back. It was so cute.
We surmised they were secretly communicating and we'd joke that when we
weren't home, Hailey would have the raccoons over for poker. Heh,
we're weird, what can I say.
Ok, I know, raccoons are mean little mf's and can be highly destructive
dumpster sharks but c'mon, they're cherubical, their little bandit faces....
But, fail after fail, this became a smart $40 canvas drop cloth headboard
instead that, like I said, can be totally customized. And the
raccoons? Well, they're the artwork now and the frames are a future
post.

|
| See....it did make sense but, sigh, I couldn't get it. |
What did I use?
- one 6’ x 9’ canvas drop cloth*
- yarn*
- one 6’ long dowel*
- three 1 1/2” diameter PVC couplings*
- faux suede*
- spray adhesive*
- corks*
- various hardware, tools, and ancillaries as needed
All right. But why is this a smart canvas drop cloth headboard,
you ask?
It has secret pockets for a book or magazines or a tablet plus a cell phone.
Ah haaaa, smart, yes? Everything needs pockets.
The smart idea came from smart Mike though when he evaluated it upon
arriving home, he seemed glum that I hadn't done the pockets the way he was
likely envisioning, probably like sacks.
Either way, let's be sure to thank Mike for the smart idea for a smart
addition.
To start, the fabric. It can be whatever you’d like, totally up to you
but I went a cost-conscious route with a hardware store
canvas drop cloth.* Buying that length and width at the fabric store would have run a
bundle more.
Just give it an iron or steam and you’re good to go.
This bed is a full size, hence the 6’x9’ tarp; the six foot dimension was
wide enough and the nine gave me double thickness heft, a way to hang it,
plus lots of height to play with.
Right, so fold it in half and measure to width, allowing for seams.
Down to 54" finished I went, also based on the available space.
Trim as required and stitch on a sewing machine* or if you don’t have one, by hand is fine too. You could even use a
large eye or yarn needle* and yarn.

|
| Where's my dog? I am shocked, shocked. |
Next I figured out where I needed to snip to make extra-wide tabs at the
top, like a tab top curtain.*
Those
PVC couplings
are my hanging brackets, see, so the tab holes needed to fit around those.
One at center and two starting at three inches in from the edges.
Measure four hundred times so you only cut once.

|
| That bottom image, yeah, that's when I realized oops. |
Heh. I ended up with too-tall cutouts as I wasn't thinking.
Flip it inside out and stitch the cut canvas to keep it from fraying too
badly. Or let it fray for a different look.
Once those openings are done, stitch a top pocket all the way across, five
inches in my case, on the machine or again by hand or with yarn.

|
| Hot tip: if your machine doesn't have markings beyond an inch or two for seams, measure out and slap on some tape as a guide. |
While you’re here, stitch the bottom of the canvas together too.
Doesn’t have to be fancy unless you suspect it’ll be seen. Or
don't. I had planned to use a second dowel to weight the bottom but
didn't.
Ok! Not bad so far, right?
Onto the PVC couplings.
Drill a 7/16" hole straight through the center, or whatever size you like
but ensure there’s a cork plug that fits it and you have a screw driving bit
that fits through it.

|
| Counter clockwise from top left: parts and supplies; fabric and spray adhesive; finished fabric wrapped PVC. |
Snip some of your faux suede or leather, or use more of the yarn if you’d
like, or leather cording or whatever floats your boat, wrap it around the
coupling and adhere it.
Using spray adhesive on the fabric then wrapping it around is fast,
effortless, and a tad messy sticky but best, or use hot glue. Ideally,
the whole coupling is coated in a glue so the wrapping doesn't shift.
Carefully snip out the holes you pre-drilled and it's time to take our
assembly lap!
Trim the dowel to size, grab a
screw gun* and a
stud finder,* if you’d like, a
tape measure,* a pencil, maybe some painters tape, a
level*
or a
laser level
is surely handy, and head off to the bedroom.
Locate where on the wall you want your fancy pants handmade smart canvas
drop cloth headboard to hang, make a few marks.
Map out where your PVC brackets go on the wall based on your canvas.
Start with center first. If you can find a stud in the wall,
great, but if not, be sure to use something like
screw-in wall anchors.*
Stick a screw through the hole you made in the PVC coupling and screw it to
the wall. Neat, right? Repeat and we're ready for the canvas
drop cloth.

|
| Clockwise from top left: drop a washer-wrapped screw into the inside hole; drive the screw through using the outside hole; brackets attached to the wall and corks plugging up the holes. Sorry for the blurry photos (ugh, eye roll). |
Now just weave the dowel through the pockets and PVC couplings and there it
hangs. Whew!
Nice thing about this is that you can dress up the canvas drop cloth any
which way. Dye it, paint it, add embellishments to it, ya know,
whatever you want really.
This is when I texted Mike though and said "hm babe, this needs something"
since I didn't get my raccoon. Hence his smart pocket moment.
With a yarn needle, I stitched long fat stitches horizontally across, making
sure to grab both layers of fabric. It's hard to see but I left the
ends long, hanging off unknotted. But voila, pockets! Handy,
right? That Mike! So smart!

|
| Fits an Animaniacs comic from June 1996, a Wag magazine I had a feature in, and my cell phone! |
But there we have it, it's a smart $40 canvas drop cloth headboard that
brings a dressy casual finish to this corner!


|
| Yep, still using that jute twine lampshade! |

*The canvas drop cloths are both Home Depot and Lowes affiliate links.
The yarn and spray adhesives are Michaels affiliate links. The
6 ft. dowels, PVC couplings, and screw guns are Home Depot affiliate
links. The corks and levels are Lowes affiliate links. The tab
top curtains, stud finders, tape measures, and screw-in wall anchors are
Amazon affiliate links. The sewing machines and yarn needles are
Joann Fabrics affiliate links. The raccoon prints are Etsy affiliate
links. Whooie!! Mwah, thanks! Please see the "boring
stuff" tab for more info.


I love it!! Looks great and the pockets are definitely a plus!
ReplyDeleteOh fantastic! Thank you so much!
Delete