
So last time I promised you a lesson on how to stencil paint a ceramic tile floor. Do not skip part A, be sure to read the inaugural What I Learned post about stencil painting a ceramic tile floor. Save yourself headaches.
Righty-o, let's do this.
First! Clean the floor. Yep. Yawn.
Oh wait, first first, pick your stencil. As I mentioned last time, take note of your tile and buy the right size stencil, one that's appropriate for your existing floor. Ah see, ok, go read that other post first and you'll understand what I mean there.
My stencil came from Etsy* (update: the seller, Olive Leaf Stencils, is not currently selling on Etsy; the name of the stencil was "Tunisian") which is a pretty handy place to get one as you can get it sized exactly for your tile, mine being 11.75" square.
 |
| Be forewarned, it's hard to take photos in this window-less bathroom. Here's the stencil I used and after some Photoshopping, I filled in the colors to plan, well, my plan. All that fur caught in the stencil....oy me. |
Ok ok, now it's ....no wait, go buy your paint and supplies next.
Again, as I mentioned last time, you are not required to use those gimmicky paints to paint a ceramic tile floor. Oreo. No, I'm going to refrain and not go on another paint rant, no I am not gonna do it, no. No.
Buy a quality bonding primer, a bonding adhesion primer or some such type of primer that's made to stick itself and stick itself good to ceramic tile. I bought a quart of Bondz* by Zinsser but there are oodles of other brands.* Ask at the paint counter if you're not finding what you need.
While you're at the paint counter, pick up some latex in the base background color you desire. In my case, I grabbed a quart of a color called Shark, heh, by Pittsburg. Minor regrets, wish I had gone a little darker but I'm ok, made my peace.
Next, buy the paint for the stencil, or better yet, use paint you already have at home. If you use stuff you've already got, like an accent using what you painted the walls with (ahh haaa), you can really tie a room together. Not be matchy matchy, just tie it together. Or, don't. Pick whatever colors make you happy.
Kinda the hardest part is picking the colors and deciding which parts will be which colors. But you can do this!
For our floor, I picked up a sample size of Mercurial by Pittsburg, a bottle of silvery metallic craft paint,* then used the gray from the walls (Improbable by Pittsburg), and an old but kinda still viable quart of Tropical Lagoon by Glidden.
Paint finishes do not matter here fyi, like flat, satin, blah-dee-blah, so save your dough and get flat.
Now, you don't need massive quantities of paint. As you're using so little of it, you can get by on small containers, or smaller. This particular floor is not large at about thirty four square feet sooo, minimal paint needs. But, I overbought because that's what I do.
As you can surmise, I spent very little on colors, like ten bucks, which hey, is fantastic! It doesn't have to break the bank, this project.
Oh, grab a can of water-based polyurethane while at the store too, being mindful of the sheen. The can of satin I picked up tested out like *waaaahhh!!* gloss, so I exchanged it for matte. Make sure you buy enough for a minimum of five coats. A quart was all I needed.
Get some painter's tape while you're there too. And if you don't have paint brushes or your preferred stenciling tools, pick those up. I used cosmetic sponges,* they could not have been more perfect.
Now, back home, take out any obstructions in your way like the toilet or quarter round shoe moulding or whatever. Trust me, it's worth it and it will make your life easier.
Oh, so I tried a tip I read in a coupla' places, just to see: sand the floor. Yeah, confused look, furrowed brow, head tilt. Ceramic is meant to be indestructible, right? Guess what? Sanding didn't do a stitch of nothin' except remove the grout and tile adhesive I got every-darn-where. So, sand or don't, up to you.
Now! Now it's time to clean the floor! Heh! Vacuum vacuum, vacuum some more, especially if you have shedding pets. Ugh the fur!!!! Then clean the floor and the grout however you choose except!, avoid any cleaner that will leave behind a film or a residue or powder behind like TSP would. Otherwise you have to clean again.
And skip using vinegar on the grout. In general, don't use vinegar on grout.
Ok, it's paaarr-taaayy paintin' time! Slap on two to three coats of the bonding primer, allowing it to dry thoroughly between. Brush the edges, roll the rest.
Next up, base coat. Base coat that puppy a good two or three coats as well, however many it takes to reach evenness of color. Or, make the base coat uneven or blend in more than one color, it'll add dimension. Let all that dry thoroughly between too.
Now it's finally stencil time. Ready? Don't panic.
Grab an old plate or tray or cookie sheet or whatever and dribble on small amounts of each color you're using. With the painter's tape, tape down the stencil over a tile, lining it up to the edges. Just a few four or so small pieces of tape will secure it.
Lightly, and I mean lightly, dip your stencil brush/tool/cosmetic wedge in the paint, dab it off to the side on the plate/tray/sheet/whatever to get most of the paint off, hold the stencil down with one hand and dab it repeatedly with the tool.
Or ok, that was my method. I've seen folks roll their stencils and that freaks me the F out -- how does the paint not seep and leak everywhere?! Because it will somehow, some way, no matter what method you use. It's paint.
I had leaks. Don't get mad at yourself, it's normal. Merely touch them up with a small paint brush or leave them be, it's ok either way. Hand-painted anything is never perfect.
I built up the layers of paint. Dab dab stencil, dip in paint, dab dab some more. Too much paint is a recipe for a mess. Did you know dab backwards is dab?
So just keep going. Keep crawling around on that cold cold hard floor until all the tiles are filled.
The dog fur and the fuzzies and the hairs off my head and the dog fur and the time it took to do this and the dog fur dog fur dog fur, I thought I might lose whatever was left of my mind, but I survived. This task took darn near forever. It is a patience tester.
Once it was done though, and I had a lot of decisions to make along the way dealing with that horrifyingly bad existing tile layout, I was quite pleased.
Again, as I mentioned last time, you are not required to use those gimmicky paints to paint a ceramic tile floor. Oreo. No, I'm going to refrain and not go on another paint rant, no I am not gonna do it, no. No.
Buy a quality bonding primer, a bonding adhesion primer or some such type of primer that's made to stick itself and stick itself good to ceramic tile. I bought a quart of Bondz* by Zinsser but there are oodles of other brands.* Ask at the paint counter if you're not finding what you need.
While you're at the paint counter, pick up some latex in the base background color you desire. In my case, I grabbed a quart of a color called Shark, heh, by Pittsburg. Minor regrets, wish I had gone a little darker but I'm ok, made my peace.
Next, buy the paint for the stencil, or better yet, use paint you already have at home. If you use stuff you've already got, like an accent using what you painted the walls with (ahh haaa), you can really tie a room together. Not be matchy matchy, just tie it together. Or, don't. Pick whatever colors make you happy.
Kinda the hardest part is picking the colors and deciding which parts will be which colors. But you can do this!
For our floor, I picked up a sample size of Mercurial by Pittsburg, a bottle of silvery metallic craft paint,* then used the gray from the walls (Improbable by Pittsburg), and an old but kinda still viable quart of Tropical Lagoon by Glidden.
Paint finishes do not matter here fyi, like flat, satin, blah-dee-blah, so save your dough and get flat.
Now, you don't need massive quantities of paint. As you're using so little of it, you can get by on small containers, or smaller. This particular floor is not large at about thirty four square feet sooo, minimal paint needs. But, I overbought because that's what I do.
As you can surmise, I spent very little on colors, like ten bucks, which hey, is fantastic! It doesn't have to break the bank, this project.
Oh, grab a can of water-based polyurethane while at the store too, being mindful of the sheen. The can of satin I picked up tested out like *waaaahhh!!* gloss, so I exchanged it for matte. Make sure you buy enough for a minimum of five coats. A quart was all I needed.
Get some painter's tape while you're there too. And if you don't have paint brushes or your preferred stenciling tools, pick those up. I used cosmetic sponges,* they could not have been more perfect.
Now, back home, take out any obstructions in your way like the toilet or quarter round shoe moulding or whatever. Trust me, it's worth it and it will make your life easier.
 |
| Before. |
Now! Now it's time to clean the floor! Heh! Vacuum vacuum, vacuum some more, especially if you have shedding pets. Ugh the fur!!!! Then clean the floor and the grout however you choose except!, avoid any cleaner that will leave behind a film or a residue or powder behind like TSP would. Otherwise you have to clean again.
And skip using vinegar on the grout. In general, don't use vinegar on grout.
 |
| Sanded, cleaned, vacuumed, there's still dog fur dammit, ready to go. |
 |
| Top: one coat just applied, still wet Bottom: three coats of primer, dried |
 |
| Doesn't look much different but there's three coats of Shark. |
Grab an old plate or tray or cookie sheet or whatever and dribble on small amounts of each color you're using. With the painter's tape, tape down the stencil over a tile, lining it up to the edges. Just a few four or so small pieces of tape will secure it.
Lightly, and I mean lightly, dip your stencil brush/tool/cosmetic wedge in the paint, dab it off to the side on the plate/tray/sheet/whatever to get most of the paint off, hold the stencil down with one hand and dab it repeatedly with the tool.
 |
| And then yep, that's when I realized I still bought the wrong stencil as the corners are meant to line up. Ah jeez frickin' louise, screw it. |
I had leaks. Don't get mad at yourself, it's normal. Merely touch them up with a small paint brush or leave them be, it's ok either way. Hand-painted anything is never perfect.
I built up the layers of paint. Dab dab stencil, dip in paint, dab dab some more. Too much paint is a recipe for a mess. Did you know dab backwards is dab?
 |
| Two tiles down. How many to go? I'm not done yet? Why did I do this again? |
The dog fur and the fuzzies and the hairs off my head and the dog fur and the time it took to do this and the dog fur dog fur dog fur, I thought I might lose whatever was left of my mind, but I survived. This task took darn near forever. It is a patience tester.
 |
| Wait, how many more to go? Really? That one on the left is a made up tile actually as it's really two smaller miscut existing tiles....aka poorly done floor tiling. |
 |
| Hallelujah, it's freakin' done. Or the painting portion of this event is anyway. |
 |
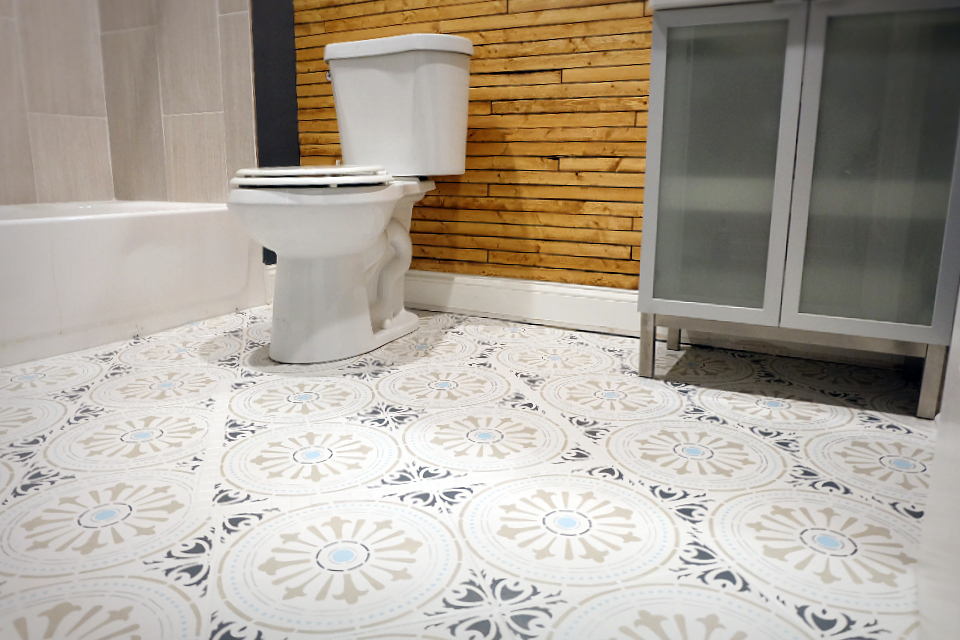
| We have painted floor. Whew. And weirdly, the offset corner patterns don't bother me. And yes, I ignored the little 1" tiles in the middle. Trust me, I hemmed and hawed, ultimately deciding to not pull focus with a colored rectangular line in the middle of the floor. |
 |
| Methinks this can was mis-labeled. It was definitely not satin. |
And there you have it, a stencil painted ceramic tile floor. Woot woot! Butt. Wiggle. Dance. Big time.
 |
| There it is, a painted ceramic tile floor! Muuuch better than that ugly tile. |
"I painted that."
 |
| Ta da! |
Wheeewwwww.
In the end? It probably would've been faster and easier to rip it all out and redo it, redo it properly. But in the end though, I do like it. It's not perfect, there are a few errant dog furs stuck in the paint and in the poly, leaks I didn't touch up, but, hey, it's hand painted. And done. Heh. Yay!
All that's left is to wrap this flippin' room up! Woo!
*The Etsy stencil is an Etsy affiliate link. The Bondz, primers, silver paint, and cosmetic sponges are Amazon affiliate links. Mwah, thanks! Please see the "boring stuff" tab for more info.


I love it!! And I love listening to your dialog---reminds me of me! LOL
ReplyDeleteThank you so much! That's fantastic, thank you, you brought a big smile to my face!
DeleteWe are definitely soul sisters from another mother! and the angle on your floor kinda bugs the OCD in me... but , the floor looks great! I have 3 shedding little bas**rds... one is supposed to be non-shedding .. ya right. ..so when I embark on this, because I am planning to.. say a small prayer for me , or swear , whatever floats your boat : ) Feeling the connection in Michigan!
ReplyDeleteI gotchu (I'm doing that two finger eye to eye hand gesture thing there). Yeah sorry, that whole existing floor is a disaster but thank you, I'm thrilled you like it! And yeah, ha ha ha, no shedding....Ok, I'm wishing you all the best juju and vibes and sending good stencil karma luck your way! When I hear swearing over the lake, I'll know it's you and will bow my head in solidarity. Thanks and wishing you all the best!
DeleteIt looks great! Ilike the colors you used. I'll try it in a small bathroom to see how it comes out. Before I do the master bath. It's a good way to save money. Thank you for the idea!
ReplyDeleteThank you! Yes, trying it in a smaller room first is a great idea. Hope it works out for you! Thanks!
DeleteI'm nearly ready mentally to do a bathroom floor, but the grout is broken and chunked in a few places. Any tips on a fix that will work? Your project is beautiful! Your attitude is real and I like it!
ReplyDeleteSounds like you'll have to get that old grout out and stuff in some new. It's not hard -- either grab a grout removal tool from the hardware store or a rotary tool and pop it out. Once the new is in, you'll be all set to go with painting. Good luck, I hope it turns out fantastically!
Deleteok so did you just paint the stencil over the grout lines where the tile layout was weird? Our entry way has those god-awful diagonal diamonds as "centerpieces" to an otherwise square grid tile layout and i dont know what to do with them?! do a different stencil on them, or just pretend like they arent there and stencil over the existing tile pattern as if its all one flat floor
ReplyDeleteOh I feel your pain and understand your dilemma! I followed the tiles themselves which, if you zoom in, you can see the pattern doesn't line up. Oddly it doesn't make me nuts. In your case, you can do either. You'll have to figure out what your tolerance level is -- seeing the pattern dip and curve into the grout line or bumping up a feature that makes you batty. Generally speaking, I'm of the camp to highlight the feature (you can invert the colors of the same pattern or pick a whole new one) as it then recedes, it becomes less obvious and obnoxious, especially since you're improving the whole. Do let me know what you decide and how it turns out!
DeleteFabulous job. I loved your humor you injected into your piece and telling how it really is. I have cracked title, do you think it would be okay to do this on that title? Also, how many hours between coats do you have to wait? You mentioned months with the door closed, did it take that long? One more thing, I see you removed the toilet besides the moldings. Is that necessary, the toilet removal? Sorry for all the questions. Thank you
ReplyDeleteThank you very much! Questions, I love questions!
DeleteIt might depend on how badly cracked the tile is. If it's bad, you could try to replace the tile (any is fine since you'll be painting over it) or patch it first. If it's a hairline surface crack, it should be fine hidden in the primer coats and pattern. If the tile is loose, definitely stick it back down securely.
The dry time between coats depends on the products you use and what the instructions say. Mine were a couple of hours I believe but I left it overnight between each to be extra safe. Too, life got in the way often so I couldn't always get right back to the project, hence a long time with the door shut.
I did remove the toilet just so that I could get the primer and paint underneath rather than up against. It's a personal preference -- if you don't want to remove it, you certainly don't have to. I only took out the 1/4 round molding as paint up to the baseboard is fine; new 1/4 round covers any rough edges there.
Thank you so much for your terrific questions and your super kind compliments, I really appreciate it!